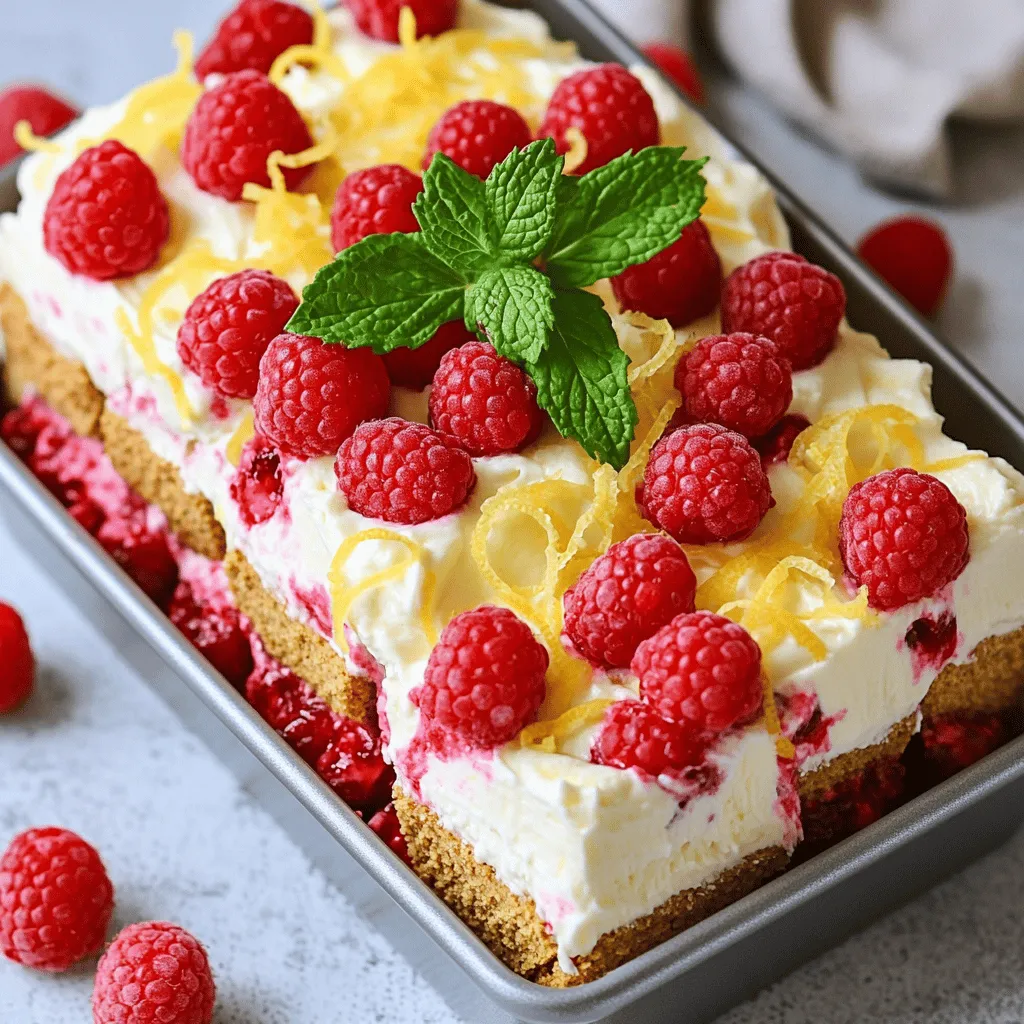
Craving a sweet, refreshing dessert? This No-Bake Lemon Raspberry Icebox Cake is the perfect answer. It combines zesty lemon and juicy raspberries into a creamy, layered delight that melts in your mouth. Plus, you don’t need to turn on the oven! In this article, I’ll walk you through easy steps, helpful tips, and delicious variations. Get ready to impress your family and friends with this simple yet sophisticated treat!
Why I Love This Recipe
- Refreshing Flavor: The combination of lemon and raspberries creates a bright, refreshing taste that’s perfect for warm weather.
- No Baking Required: This recipe is incredibly easy, as it requires no oven time, making it a hassle-free dessert option.
- Beautiful Presentation: The layers of colorful raspberries and creamy filling make for a stunning dessert that’s sure to impress guests.
- Make Ahead Convenience: Prepare this cake in advance and chill it overnight, allowing for easy entertaining without last-minute stress.
Ingredients
Complete Ingredient List
To make this zesty lemon raspberry icebox cake, you will need:
– 1 cup fresh raspberries (plus extra for garnish)
– 1 cup heavy whipping cream
– 1 cup mascarpone cheese
– 1/2 cup powdered sugar
– 1 tablespoon vanilla extract
– Zest of 1 lemon
– 2 tablespoons fresh lemon juice
– 16-20 graham crackers (or digestive biscuits)
– Fresh mint leaves (for garnish)
Substitutions for Fresh Ingredients
If you can’t find fresh raspberries, you can use strawberries or blueberries. Both fruits work well in this cake. For the mascarpone, cream cheese is a good substitute. It will give a slightly different taste but still creamy. If you want a lighter option, you can use Greek yogurt instead.
Tools Required for Preparation
To prepare the cake, gather these tools:
– Medium mixing bowl
– Electric mixer
– 9×5 inch loaf pan
– Plastic wrap
– Spatula
– Measuring cups and spoons
These tools will help you make the layers and mix the ingredients easily.

Step-by-Step Instructions
Whipping the Cream
Start by whipping the heavy cream. Use an electric mixer for this task. Mix until it thickens a bit. Next, add the powdered sugar, vanilla extract, and lemon juice. Keep whipping until you see stiff peaks. This step is key for a light and airy texture.
Folding in Mascarpone
In a separate bowl, combine the mascarpone cheese with lemon zest. This adds a bright flavor. Then, gently fold in the whipped cream mixture. Be careful not to deflate the cream. Mix until it is well combined and fluffy. This creates a smooth and rich filling.
Assembling the Icebox Cake
Prepare your loaf pan by lining it with plastic wrap. Leave some overhang so you can lift the cake out later. Start with a layer of graham crackers at the bottom. Break the crackers if needed to fit. Next, spoon a layer of the lemon-mascarpone mixture over the crackers. Spread it evenly. Sprinkle some fresh raspberries on top. Repeat these layers until you use all the ingredients. Finish with the cream layer on top. Cover the dish with the plastic wrap. Refrigerate for at least 6 hours or overnight. This allows the flavors to mix and the cake to set nicely.
Pro Tips
- Use Chilled Ingredients: Ensure the heavy cream and mascarpone cheese are chilled before whipping. This helps achieve a better volume and stability in your whipped cream.
- Fresh vs. Frozen Raspberries: While fresh raspberries are recommended for their flavor and texture, you can use frozen ones if needed. Just make sure to thaw and drain them well to avoid excess moisture.
- Layering Technique: For a more visually appealing cake, arrange the raspberries in a pattern between layers. This not only enhances the look but also adds bursts of flavor in every slice.
- Let It Set: For the best flavor and texture, let the cake chill overnight. This allows the layers to meld together beautifully and makes slicing much easier.
Tips & Tricks
Achieving Perfect Whipped Cream
To get the best whipped cream, start with cold tools. Chill your mixing bowl and beaters. This helps the cream whip faster. Use heavy whipping cream for a rich taste. Whip the cream on medium speed. Gradually add powdered sugar for sweetness. Add vanilla and lemon juice as you mix. Stop when you see stiff peaks form. This means your cream is ready.
Ensuring a Fluffy Texture
To keep your cake light, be gentle when mixing. After whipping the cream, fold it into the mascarpone. Use a spatula to lift and turn the mixture. This keeps air in the cream. Don’t stir too hard. You want a fluffy mix, not a flat one. Layer the cake carefully, too. Each layer needs to stay light and airy.
Recommended Serving Suggestions
When serving your cake, think fresh and colorful. Add extra raspberries on top for a pop of color. Fresh mint leaves make a nice touch, too. You can slice the cake into neat pieces. Serve it chilled for the best taste. Consider pairing it with herbal tea or lemonade. This cake is perfect for summer gatherings.
Variations
Alternative Fruits for Customization
You can switch up the raspberries for other fruits. Think about using strawberries, blueberries, or blackberries. Each fruit gives a new twist to the cake. Strawberries add sweetness. Blueberries bring a fun pop of color. Blackberries offer a tart flavor. Don’t be afraid to mix fruits. A blend can make the cake even more exciting.
Switching Up the Cream Base
While the mascarpone cheese is creamy and rich, you can try other bases. Cream cheese can give a tangy taste. Greek yogurt can add a healthy twist. If you want a lighter texture, use whipped topping. Just remember to adjust the sweetness based on your choice. This little change can make a big difference in flavor.
Adding Flavor Enhancements
Want to make your cake stand out? Try adding flavors like almond extract or coconut. A dash of almond extract adds warmth. A bit of coconut gives a tropical touch. You can also fold in lemon curd for a zesty kick. Another option is to sprinkle crushed cookies between layers for crunch. These little touches can boost the taste and make your cake special.
Storage Info
Best Practices for Refrigeration
To keep your No-Bake Lemon Raspberry Icebox Cake fresh, store it in the fridge. Use an airtight container or wrap it well in plastic wrap. This helps prevent it from absorbing other smells in the fridge. If you have leftovers, make sure you cover them tightly. This way, you keep the flavors bright and tasty.
How Long It Lasts in the Fridge
In the fridge, this cake lasts about 3 to 4 days. The flavors will deepen as it sits, making it even better. Just remember to check for any signs of spoilage, like off smells or changes in texture. If anything seems off, it’s best to toss it.
Freezing the Cake
If you want to keep the cake longer, freezing is a great option. To freeze, slice the cake into pieces. Wrap each piece tightly in plastic wrap, then place them in a freezer-safe bag. This way, you can enjoy a slice anytime! It will stay good for about 1 to 2 months in the freezer. When ready to eat, let the slices thaw in the fridge overnight. Enjoy the tangy lemon and sweet raspberry flavors again!
FAQs
Can I make this cake ahead of time?
Yes, you can make this cake ahead of time. It actually tastes better after chilling. I suggest making it a day before you plan to serve it. This way, the flavors blend well, and the cake sets nicely.
What can I substitute for mascarpone cheese?
If you can’t find mascarpone cheese, you have options. You can use cream cheese or ricotta as a substitute. Just make sure to mix them well for a smooth texture. Add a bit of cream to soften it up, if needed.
How do I know when the cake is set?
The cake is set when it feels firm to the touch. After chilling for at least six hours, it should hold its shape. You can also check the layers. They should look stable and not ooze out when you cut into them.
You now have all the tools to create a delicious icebox cake. We covered the essential ingredients, from the complete list to handy substitutions. The step-by-step guide showed you how to whip, fold, and assemble your cake with ease. Remember the tips for perfect whipped cream and fluffy texture. Don’t forget to explore fun variations and the best ways to store your creation. Enjoy making this cake, and share it with family and friends for a special treat. With the right steps, you can craft a delightful dessert.